

Bathroom Makeover - Brought to you: Signed by Blake

If I’ve said it once, I’ve said it a million times… “Decorating your home is a marathon and not a sprint.” I’m in year 3 in my apartment and I just finally got around to tackling my less than impressive bathroom. I was sold on my apartment the second I walked in because everything was so shiny, new and perfectly my style. (My loft was newly renovated right before I moved in.) But the one thing I’ve always said is that the bathroom must have been the room they were renovating when they started to run out of money. Because the finishes—while nice—never seemed to match the rest of the apartment. Much of it just felt like an afterthought. A cheap mirror, minimal storage and bulky vanity. So, while all the other rooms just got a little paint and/or wallpaper, I’d always planned to overhaul the bathroom in a major way. Right down to the fixtures and hardware.
That said, this project is also proof that you don’t have to spend a ton of money to make a major difference. You just have to make smart design choices. I had about $600 in my PayPal account, so I decided that would be my budget for the project and I kept myself on target by only using my PayPal debit card to make purchases.
Now, before you go freaking out and thinking to yourself, “But don’t you rent?!” Answer: Yes, I do. But that shouldn’t stop me (or you) from making cosmetic changes to your rental. All you need to do is 1) read your lease, 2) read my previous blog post for rental decor tips.
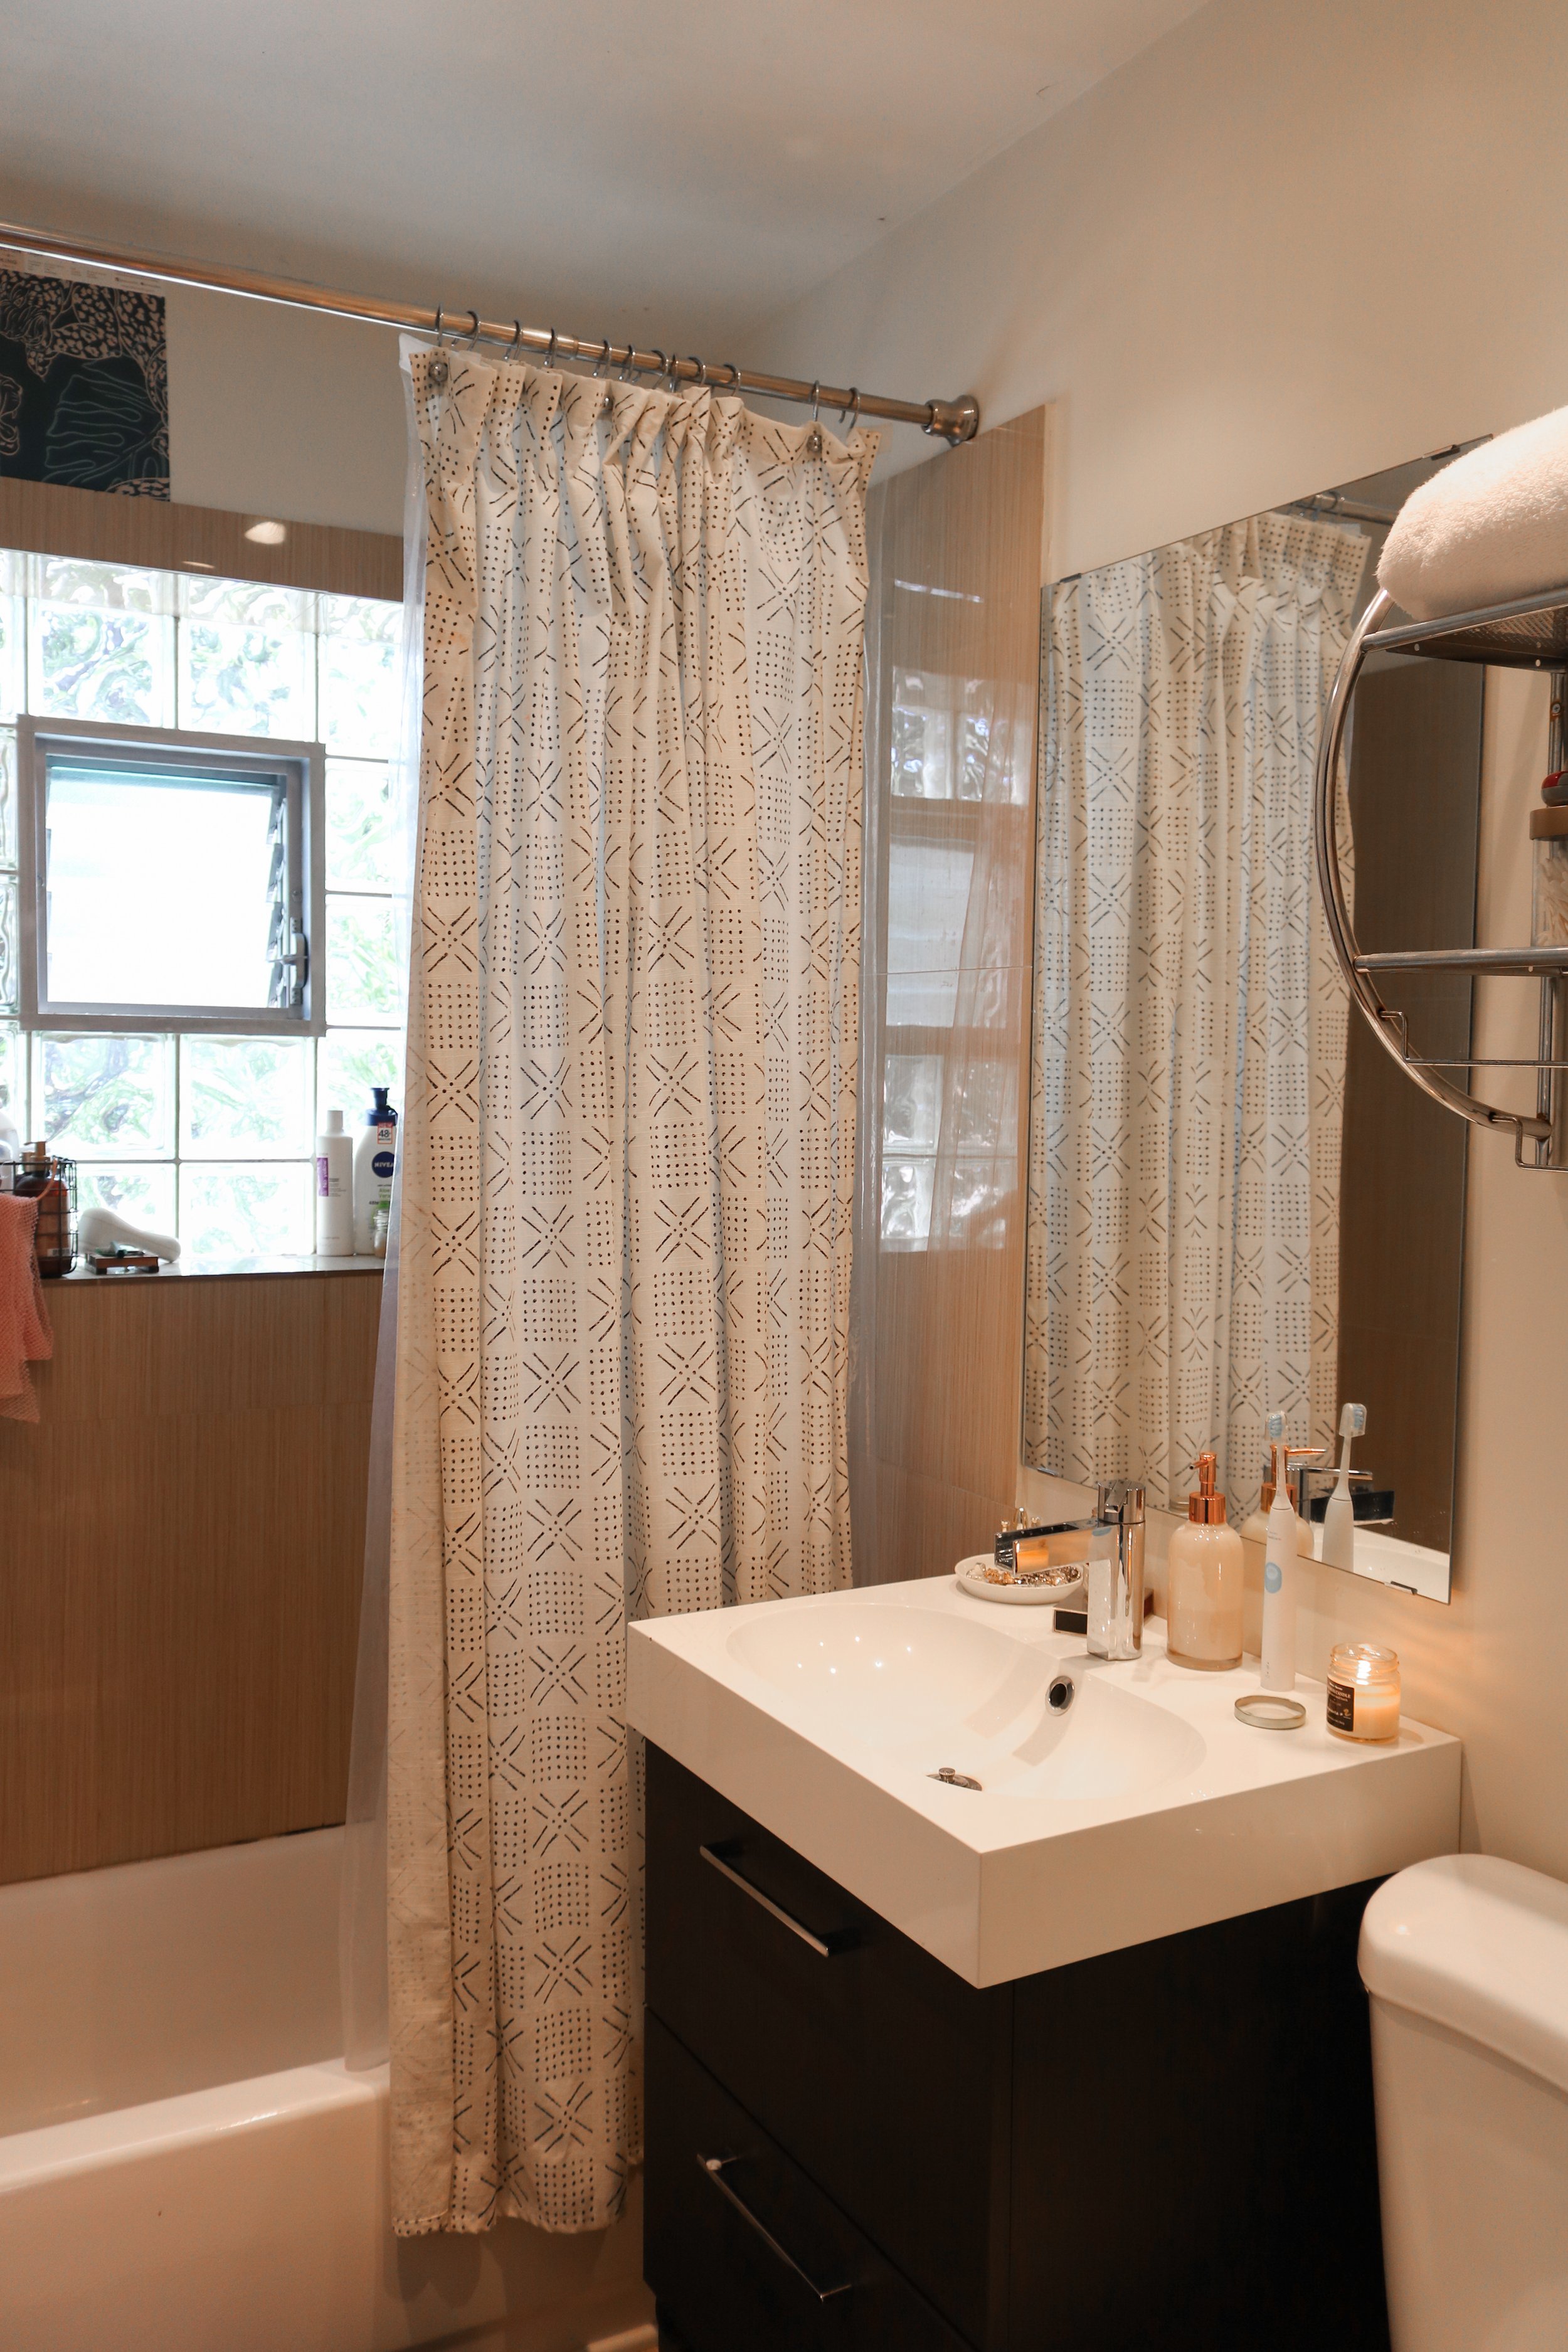
BEFORE
As you’ll see, it’s nothing fancy. Definitely not the worst bathroom I’ve ever called my own, but certainly doesn’t spark any joy either. So, it was time to get to work making it worthy of my hashtag—#loftSB.


The first thing I did was start my search for wallpaper. (I promise this is my last time using wallpaper. lol) My bathroom is pretty small and I knew that a bold patterned wallpaper would make a huge impact in the space. (Don’t be afraid to go big in small spaces!!!) But finding the right print was easier said than done. The reason it’s taken me nearly 3 years to complete this makeover is because I’ve spent the majority of that time on the hunt for something that matched the vision I had my head. Now, don’t get me wrong, there are a ton of great wallpaper sources out there (and I searched them all, trust me), but I had quite a few criteria to meet.
The wallpaper needed to be: 1) a bold pattern that I actually liked and that fit with the rest of my apartment, 2) removable since I rent and, most importantly, 3) reasonably priced. Since it was going in a high humidity area and wouldn’t have the same level of hold as traditional wallpaper, I didn’t want to spend a ton on the off chance that it didn’t hold up.
After a very exhaustive search, I decided on the cobalt Leopard Art Deco print from Milton & King. (See it in ‘Osaka’/brown in my good friend Shavonda’s bathroom). It was the bold impact I was looking for and kept with the moody vibes I love so much. I was also lucky enough to have the wonderful team at Milton & King agree to partner with me on the space. So, I was able to check off all of my boxes.
Milton & King’s removable wallpaper comes in panels instead of rolls. So I had to take exact measurements of the room and from there they figured out that I needed about 10 panels to complete the space. (I did end up using all 10 panels, but that was after deciding to cover the door and redoing a few panels. Without any mistakes or the door, I would have only used about 7 panels.) The panels are super easy to line up because they’re each exactly the same. All I had to do was start each new panel at the ceiling. Though I did use leftover pattern repeat from previous panels for the area above the shower tile in order to conserve materials.

Once I had my wallpaper all picked out and ordered, it was time to start prepping the walls and mocking up where I wanted to hang everything. Since I wasn’t sure I would have a lot of left over paper, I couldn’t afford to make any mistakes when it came to hanging and securing items to the walls. I had to get it right the first time. Or at the very least, beforehand.
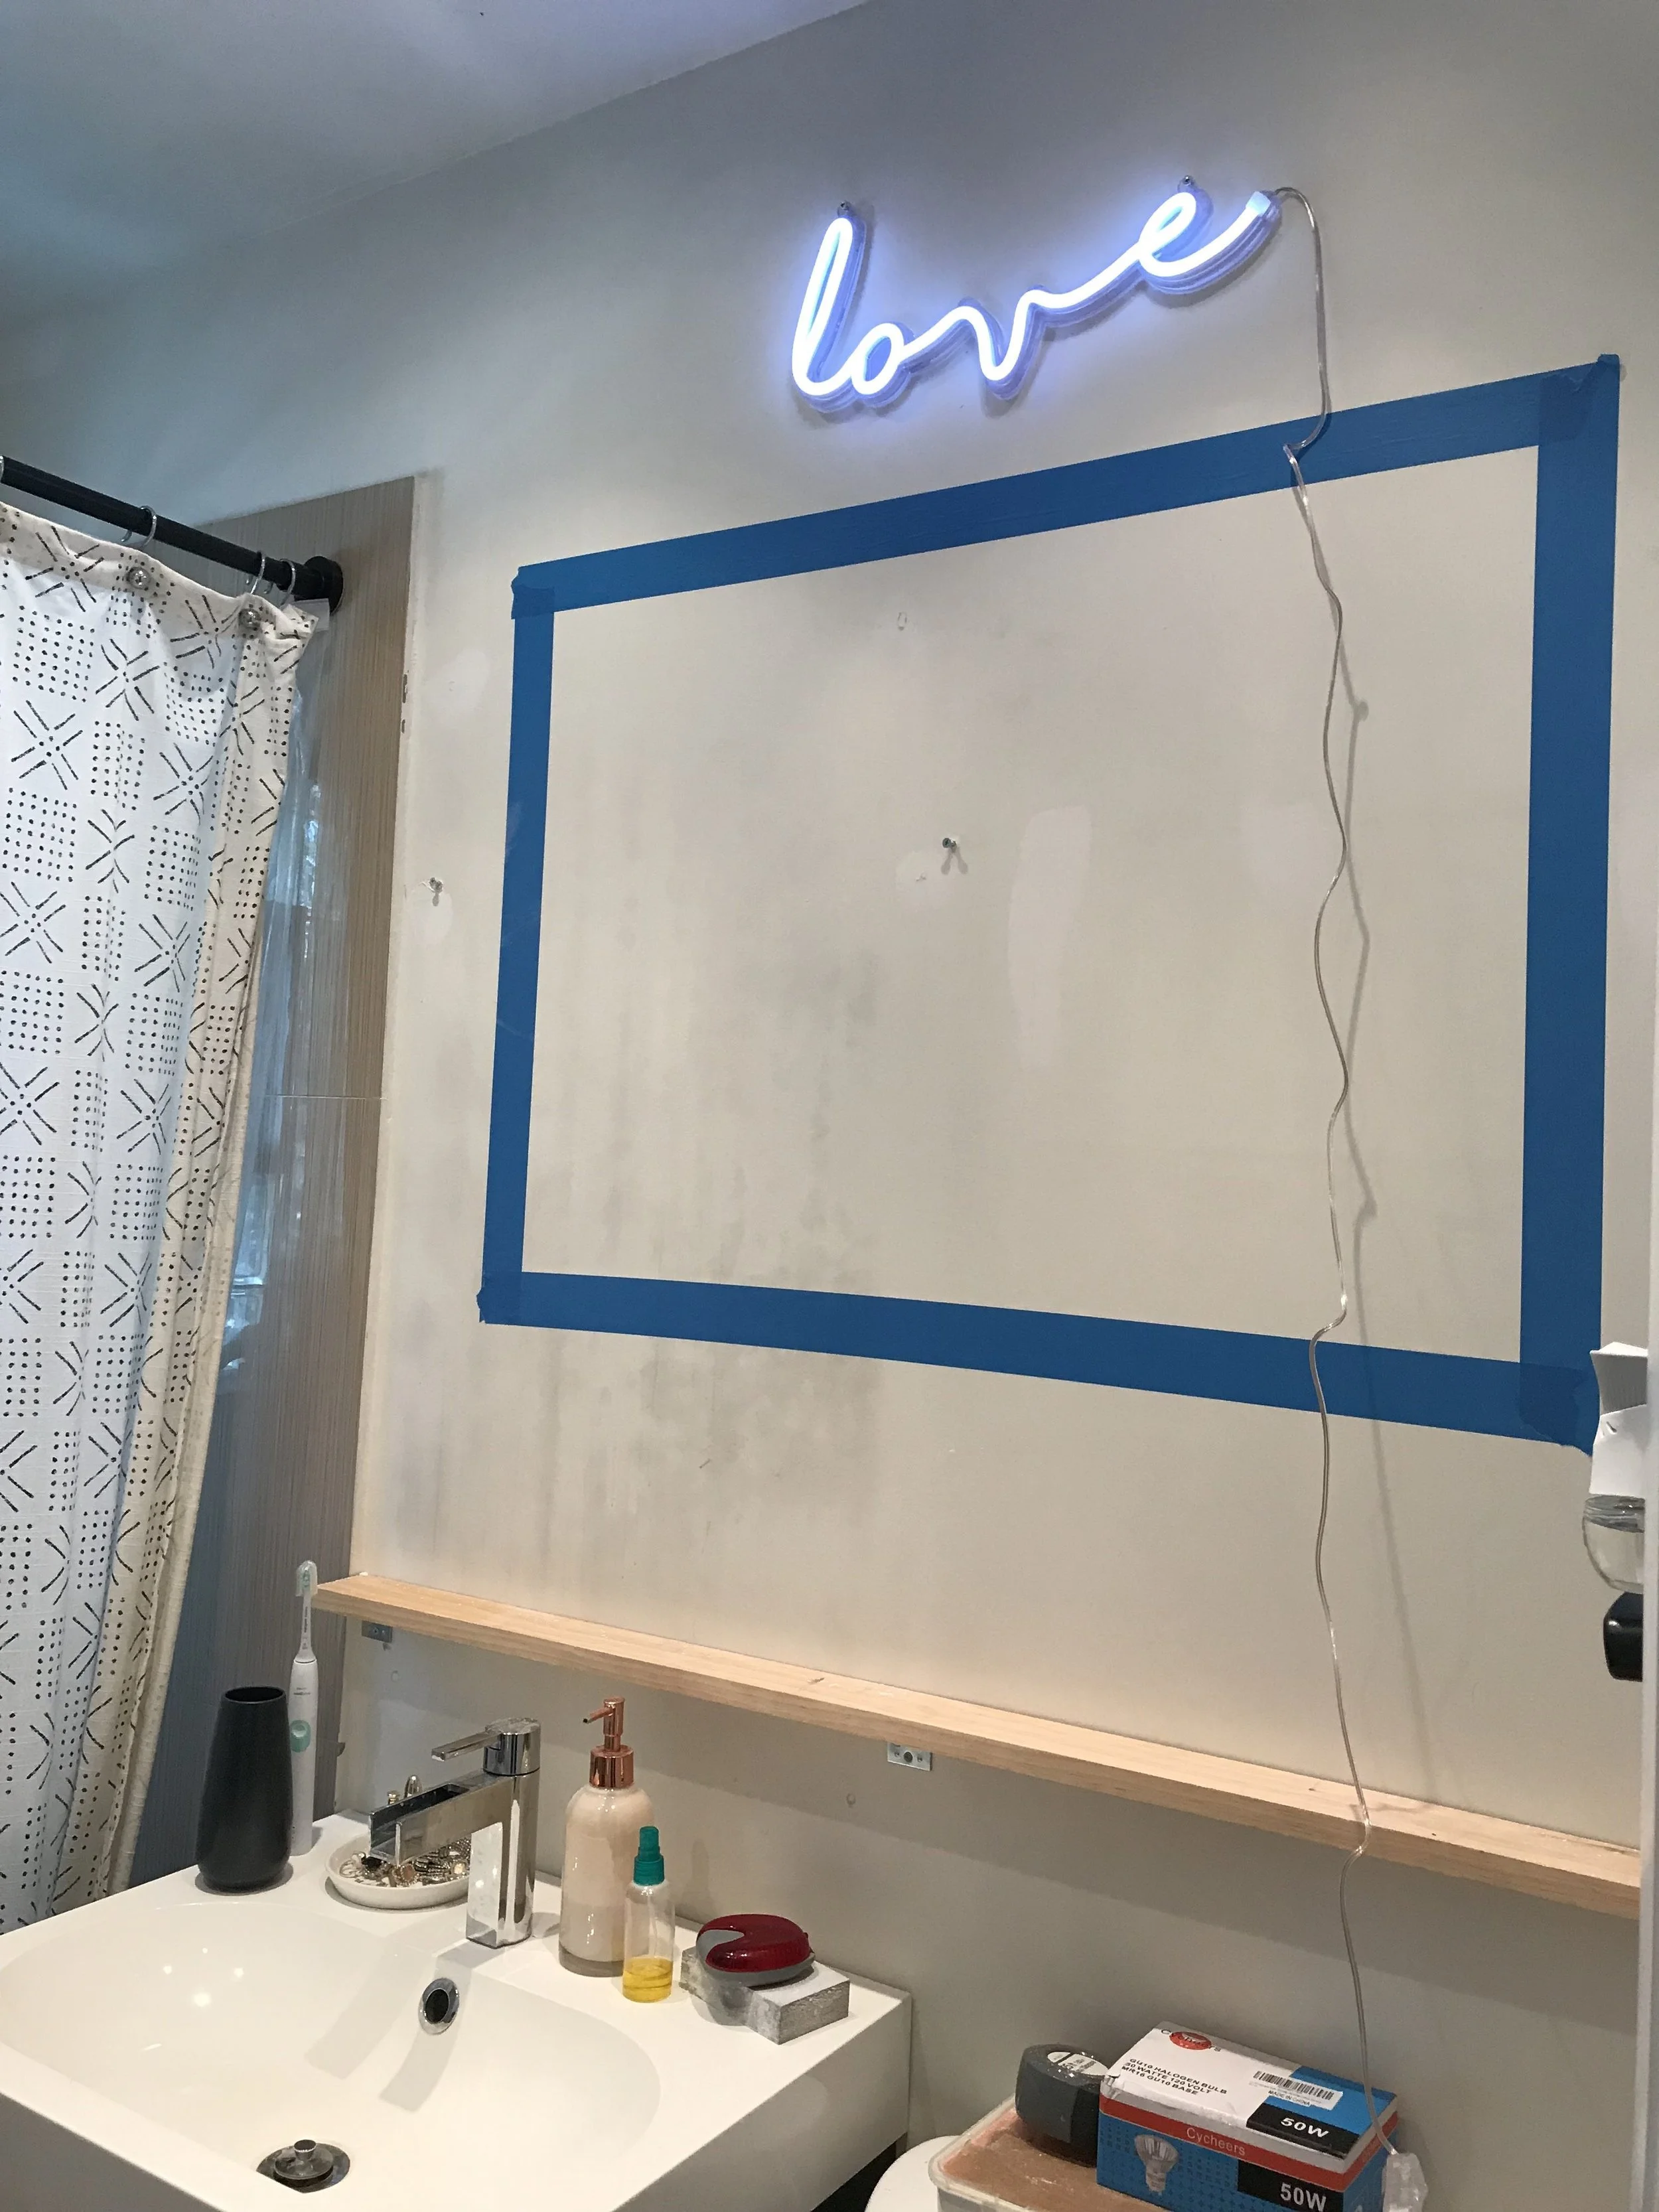
I initially planned to keep with the original layout of the bathroom with a mirror just over the sink, but on second thought decided that a larger mirror would open up the space a lot more. I used painter’s tape to figure out what size mirror I needed and then hit the internet streets to find one. I decided on this gorgeous gold framed mirror from Amazon (38×26) for only $139.

Once I knew where everything would go, I spackled over any holes I wouldn’t be using and then sanded, cleaned, and primed the walls. I left the holes I would later use to rehang things. All I had to do was run my hand along the wallpaper and I’d be able to feel where they were. No remeasuring and redrilling.
TIME TO WALLPAPER!!!
I’ll save you the boring progress photos for the wallpapering process. But if you want to see the step-by-step behind the scenes, head over to my Instagram highlights for a full behind the scenes. Let’s get to what you really came for. THE REVEAL!
AFTER


You’ll notice in the earlier mock up photos that I had a wooden shelf. I thought a natural element might look nice in the space or that maybe I’d cover it in wallpaper. In the end, I decided that a glass shelf would be best, because I wanted to keep the focus on the wallpaper. I was worried that finding the right sized shelf would be difficult and expensive, but I hit the jackpot when I found Ashland Glass shop not far from my apartment. They were able to make a custom shelf in the exact measurements I needed—2.5 in x 47.5 in (3/8 thickness)–in just a few days for only $60. I purchased the wall brackets from Amazon for $16. LIFE HACK: I kept them covered in the blue shipping film, because it helped them to blend into the wall.


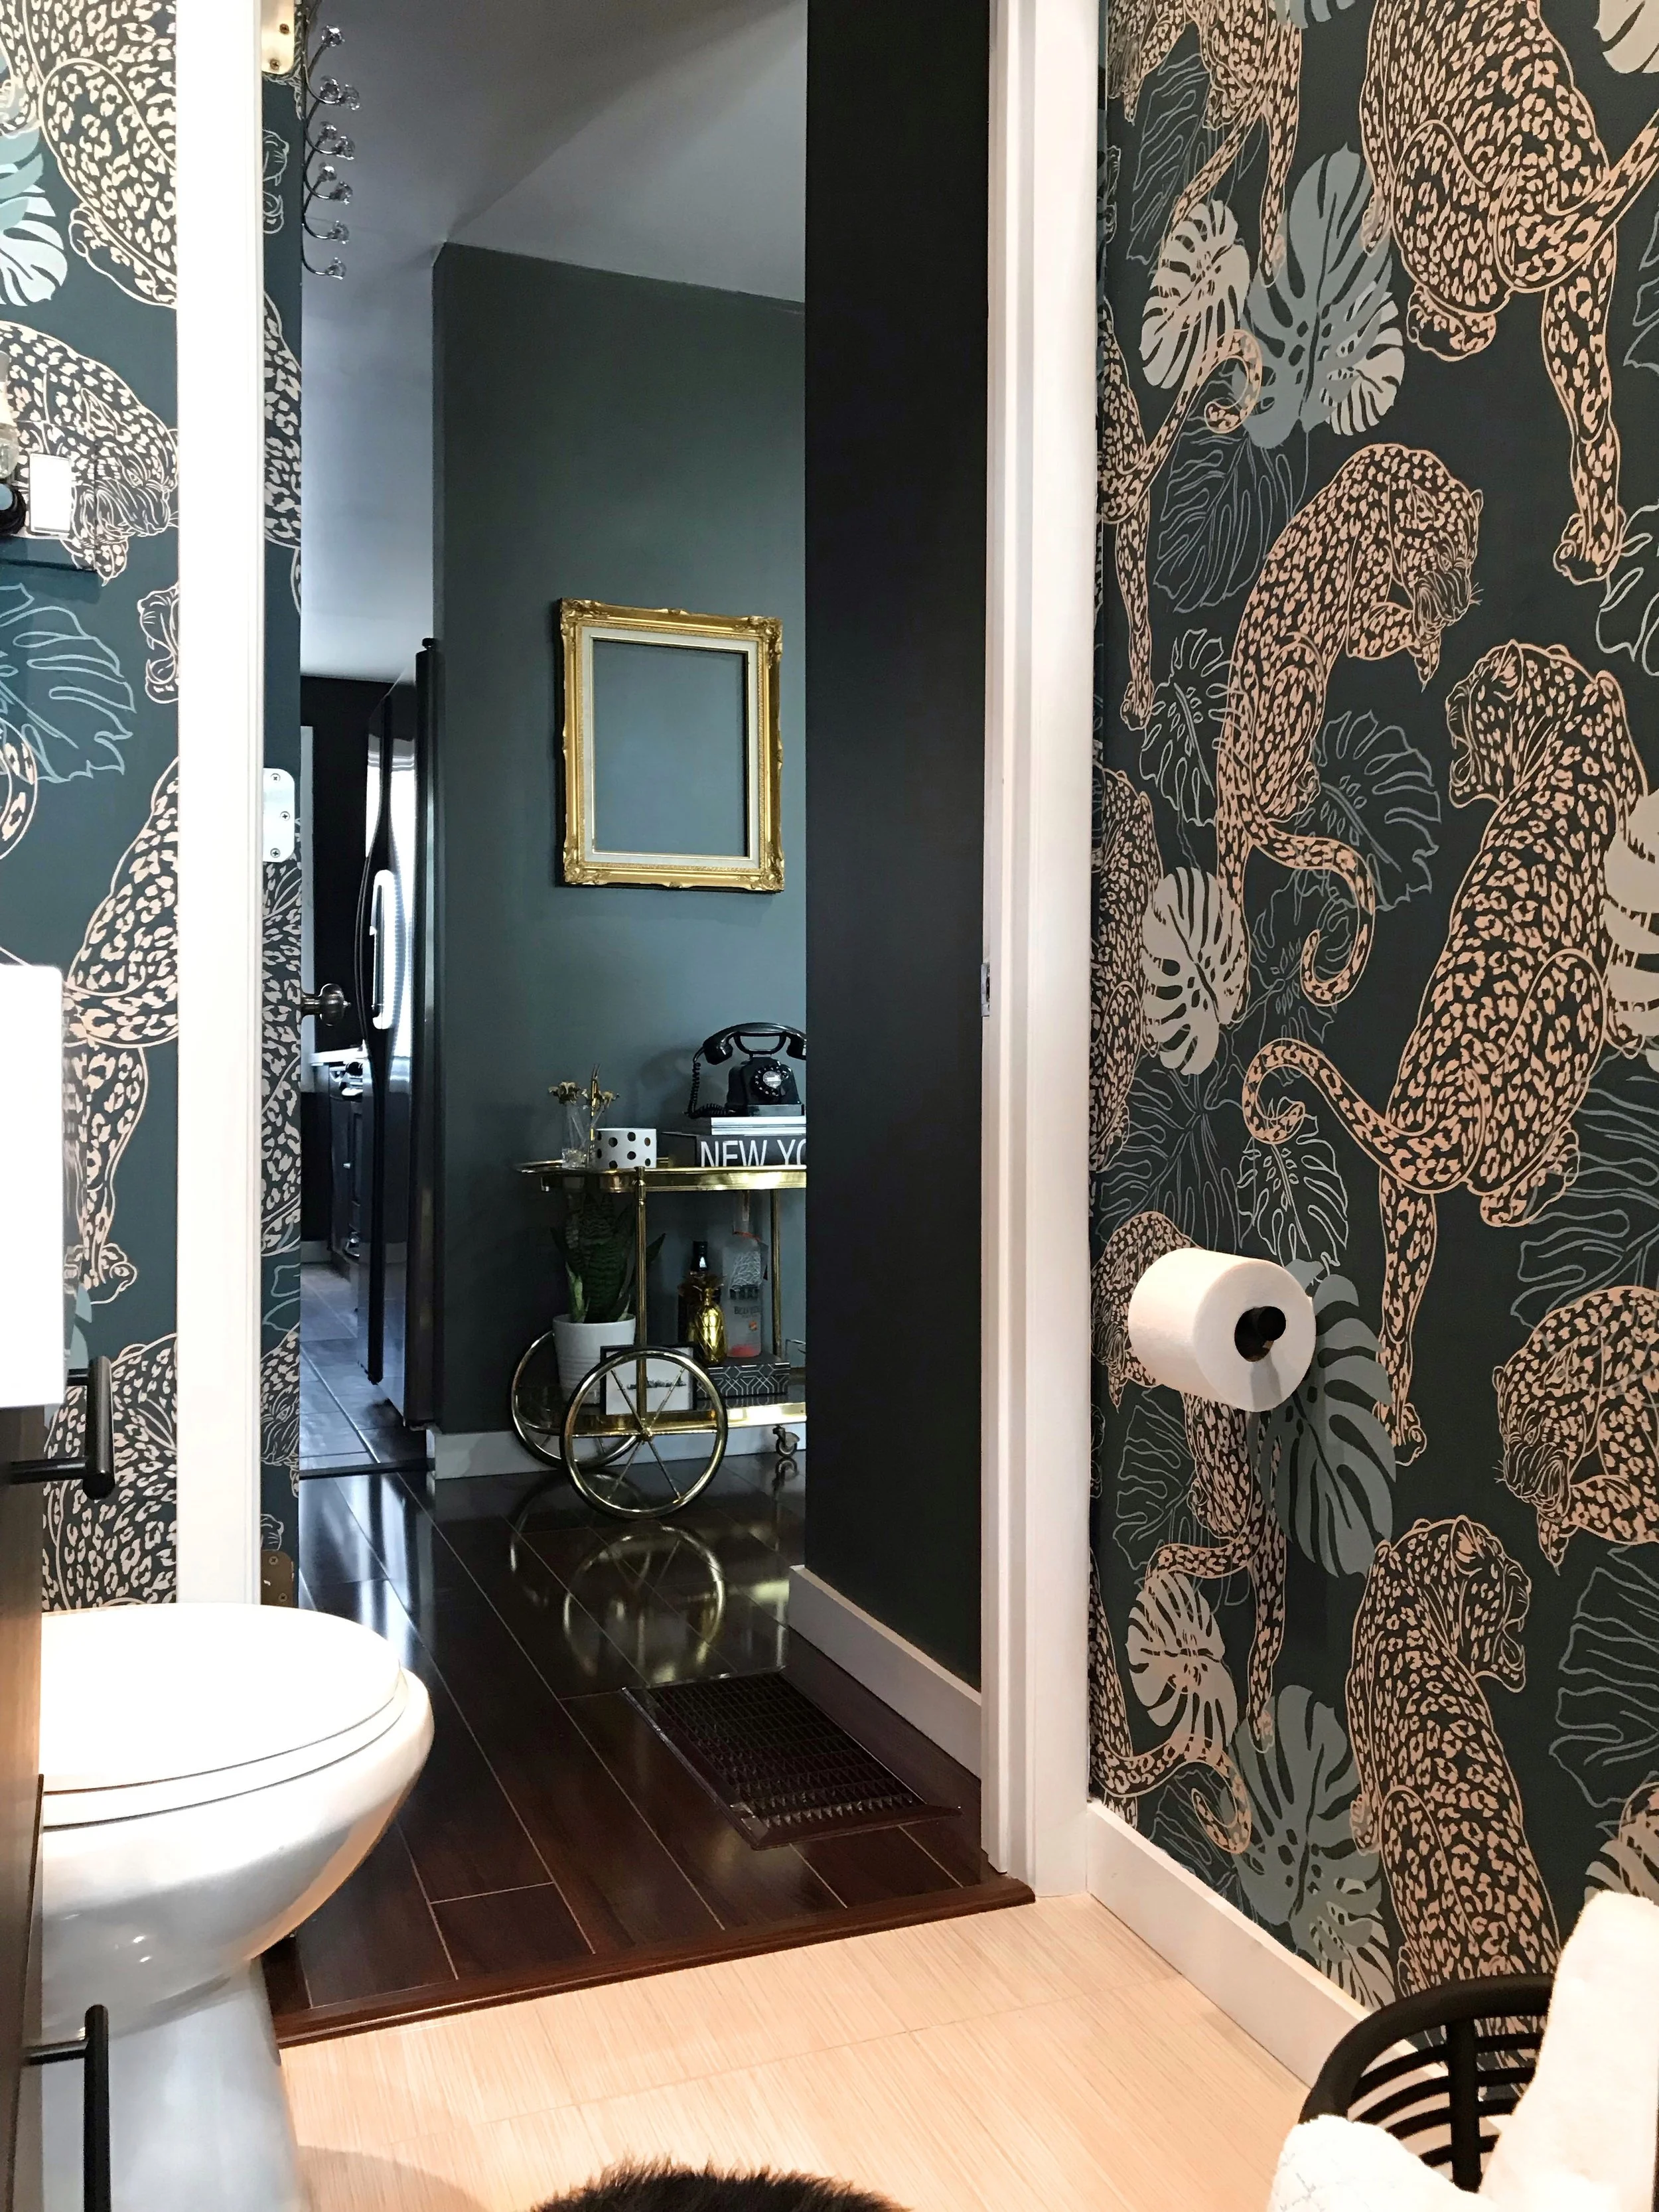


I spray painted this wicker basket matte black for a moodier look. I also substituted a traditional shower curtain for velvet window treatments. I wanted something lux and that would make a statement, but didn’t compete with the wallpaper. I was so pleasantly surprised when they showed up and were not only gorgeous, but the exact shade of teal I needed! Especially because I spent weeks looking at shower curtains and was near my wit’s end. You’d be surprised how hideous everything on the shower curtain market is.
I also wanted to add a bit of “funkiness” to the space for that boutique hotel feel, so I grabbed this neon “Love” sign on sale for $59 from Urban Outfitters. LIFE HACK: I covered the cord with left over wallpaper and used a clear command hook to tuck it into the corner so it would blend in and not be an eyesore. You hardly even notice it!


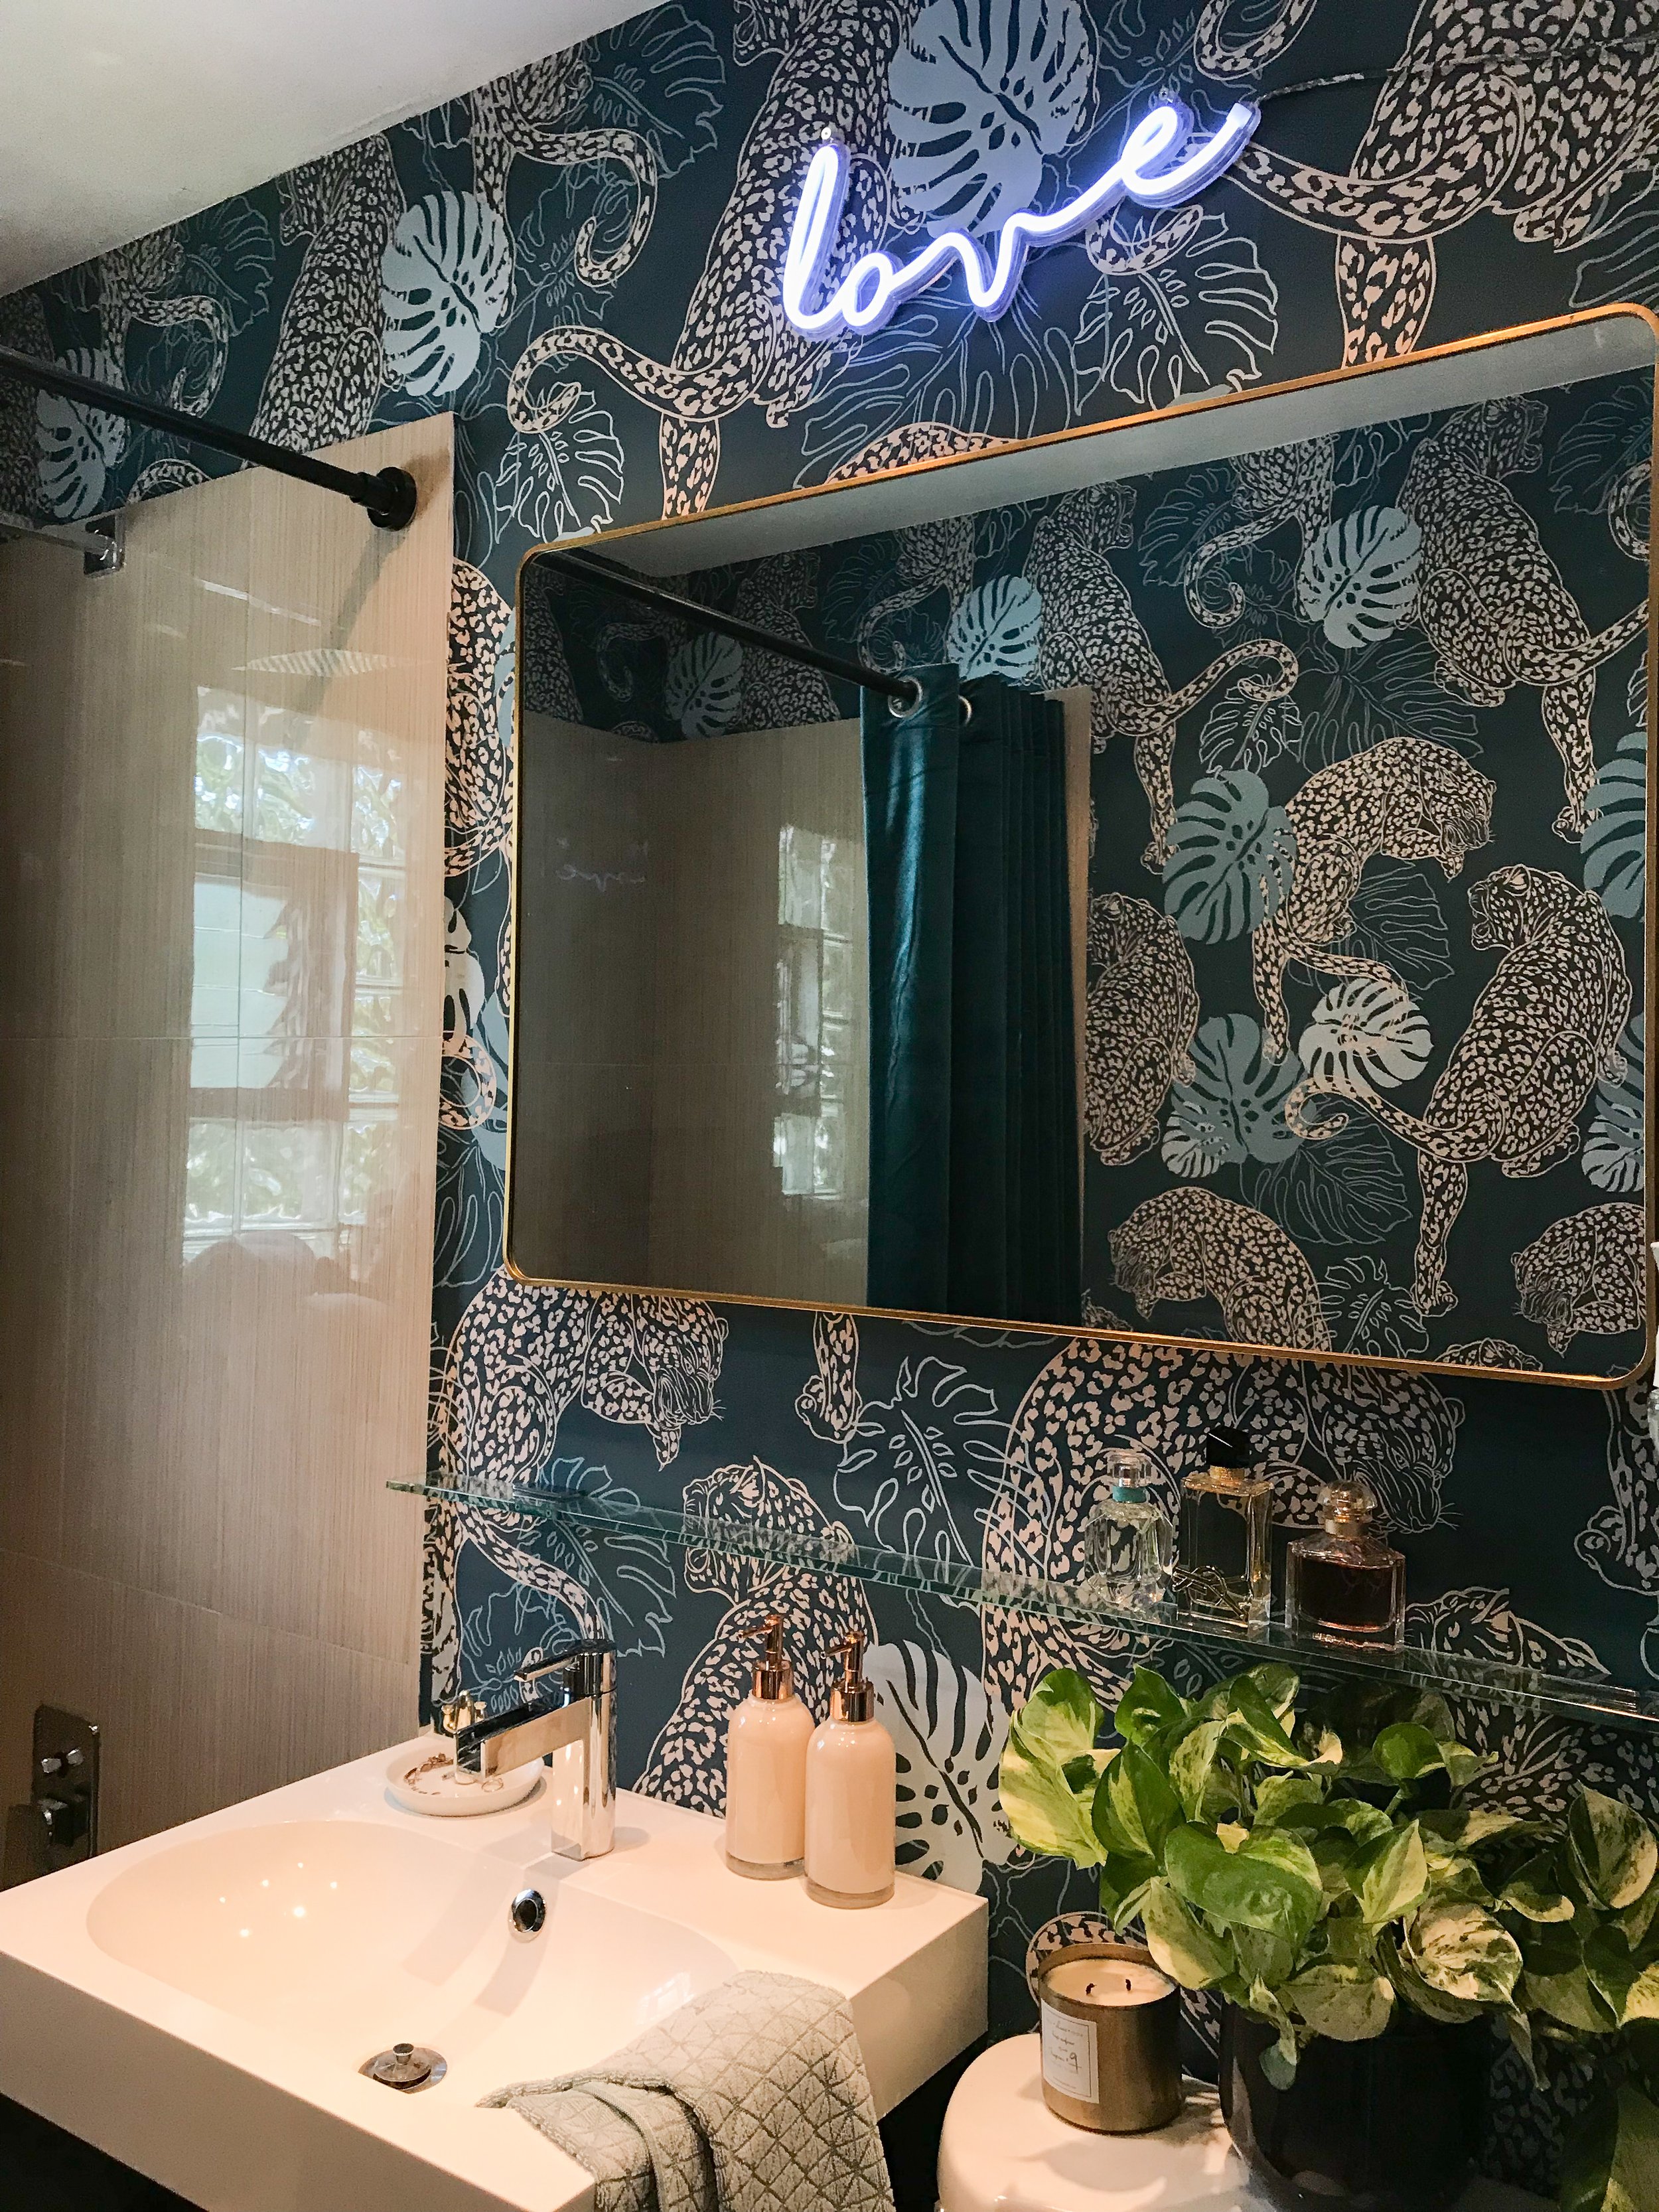
A VERY VERY special ‘Thank You!’ to Milton & King for making this project possible and for helping me create the bathroom of my dreams! I am completely and utterly obsessed with how the project turned out! It’s so much better than even I imagined. Between wallpapering the door, deciding on the larger mirror, opting for a glass shelf instead of a natural element, I’m so glad I trusted my gut.
That said, this project took more out of me physically than any other project in my home and I feel like I’ve been working on it for months—which means I’m sure I’m forgetting to mention something. So, if there’s anything I forgot or if you have questions, drop them in the comment section!
SOURCES: Leopard Removable Wallpaper – c/o Milton & King | Gold Framed Mirror – Amazon | Shower Curtain – Target | Neon “Love” Sign – Urban Outfitters | Drawer Pulls – Amazon | Rattan Towel Basket – TJ Maxx (similar here) | Custom Glass Shelf – Ashland Glass | Matte Black Shower Rod – Amazon | Toilet Paper Holder – Amazon | Soap Dispensers – Target | Over the Door Hooks – Marshalls (similar here) | Ceramic Ring Holder – Z Gallerie | Candle – Ra Synclair
Credit - signedblake.com


